Wednesday, December 9, 2009

Why has Resh been missing?

Dear Addicted to Cooking Readers,


There is a secret that I have been keeping, and its the reason for my disappearance for the last 3 months or so. I sincerely apologize that I have not kept my promise by posting frequent recipes of my delicious creations. The reason for this is because I have been baking something far more important... a little "Addicted to Eating" Baby!
Don't get me wrong, I cook a heck of a lot, everyday, mainly because I eat a LOT! But the problem? I am too tired to photograph and log everything that I cook. Also, I have been cooking the same things over and over again because its all that I crave.
However, I will be taking a mini-break and will return to blogging after the Holidays. I do not want to lose any of my readers, so please stay tuned. I will be back, and maybe with more ridiculous combination of foods as this pregnancy progresses!

Thank you so much for your support everyone, I really appreciate it, and don't forget about me!

Happy Holidays!
Resh

Friday, October 16, 2009

Sweet Rugelach, for a Sweet Year


It's true. I prepared a giant meal for Roshashana and then I lost interest in cooking for a while :( How is that possible??? Well it is! I think I needed a cooking break. Also, the fact that my kitchen has been turned inside out didn't help matters. My mother has helped in this, and sent me loads of food. So, who will cook when you have your mother's food right there staring at you? So simply put: I took a break.

I am going back into my Roshashana recipe, to indulge you with these delicious cookies. After you make these yourself, you will NEVER want to go to the bakery and by them yourself. They are not that fun to make, and sticky. Or is it that I am just a messy cook? But they are well worth the mess...

Oh yeah, because I found these a bit tedious and I wished that there were pictures out there that explained to me step-by-step on how these were made, I have taken the liberty of taking step-by-step pictures for my readers, so you know what really goes into making a delicious Rugelach. Enjoy my friends!!!!

P.S: These are lactose free. I used Tofutti cream cheese. yum yum..

Rugelach
adapted from Epicurious.com

2 cups all-purpose flour
1/2 teaspoon salt
2 sticks (1 cup) unsalted butter, softened
8 oz cream cheese, softened
1/2 cup plus 4 teaspoons sugar
1 teaspoon cinnamon
1 cup apricot preserves or raspberry jam
1 cup loosely packed golden raisins, chopped
1 1/4 cups walnuts (1/4 lb), finely chopped
Milk for brushing cookies
Special equipment: parchment paper; a small offset spatula


Whisk together flour and salt in a bowl. Beat together butter and cream cheese in a large bowl with an electric mixer until combined well. Add flour mixture and stir with a wooden spoon until a soft dough forms. Gather dough into a ball and wrap in plastic wrap, then flatten (in wrap) into a roughly 7- by 5-inch rectangle. Chill until firm, 8 to 24 hours.
Put oven rack in middle position and preheat oven to 350°F. Line bottom of a 1- to 1 1/2-inch-deep large shallow baking pan with parchment paper.
Cut dough into 4 pieces. Chill 3 pieces, wrapped in plastic wrap, and roll out remaining piece into a 12- by 8-inch rectangle on a well-floured surface with a floured rolling pin. Transfer dough to a sheet of parchment, then transfer to a tray and chill while rolling out remaining dough in same manner, transferring each to another sheet of parchment and stacking on tray.
Whisk 1/2 cup sugar with cinnamon.


Arrange 1 dough rectangle on work surface with a long side nearest you. Spread 1/4 cup preserves evenly over dough with offset spatula. Sprinkle 1/4 cup raisins and a rounded 1/4 cup walnuts over jam, then sprinkle with 2 tablespoons cinnamon sugar.
Using parchment as an aid, roll up dough tightly into a log. Place, seam side down, in lined baking pan, then pinch ends closed and tuck underneath. Make 3 more logs in same manner and arrange 1 inch apart in pan. Brush logs with milk and sprinkle each with 1 teaspoon of remaining granulated sugar. With a sharp large knife, make 3/4-inch-deep cuts crosswise in dough (not all the way through) at 1-inch intervals. (If dough is too soft to cut, chill until firmer, 20 to 30 minutes.)


Bake until golden, 45 to 50 minutes. Cool to warm in pan on a rack, about 30 minutes, then transfer logs to a cutting board and slice cookies all the way through.

Friday, September 11, 2009

Maple Glazed Salmon & Blog Upgrade!


First and foremost.. did you all notice the wonderful new logo that is hanging up top there? Isn't it so pretty? Gosh! I am simply in love with it, and I am hoping that my readers feel the same. Well, do you?? No, I am not tooting my own horn here, as I did not create it. I am tooting Design Woodpecker's horn!!! Yup! She is a fantastic photographer and a freelance designer. This is her blog: Design Woodpecker. Now bear with her, as she hasn't posted anything up but she intends to. She also will be doing logo's for anyone out there that has a blog and wants a fresh new modern look and she comes highly recommended. Her photography is top notch and her design work is simply brilliant.

NOW that I am done being giddy about my blog logo, I will move on to the other topic at hand. MMhmmm.. Salmon!!! There are only a few salmon recipes that I have tried because Salmon is something that I do not like to experiment with. I eat Salmon once a week, so I alternate between this recipe and the other one that I have posted. Anybody have any other salmon recipes that is quick, please email me, I would love to TRY and post!!!

This particular recipe is more than just delicious. Its supple, soft, flaky and moist. The hint of maple grazes over  your tongue as you finish your bite. It also goes very well with the Asparagus on my last post.

::READER SUGGESTION ON LAST POST:: I got a wonderful email from a reader on my Asparagus. I was told "break off the ends where they want to snap naturally...  drizzle with olive oil ..  salt and pepper...  Place on hot grill and grill just until the get the nice grill marks all around and serve with what ever else is coming off the grill...  wonderful." Though I do not have a grill, I did break the ends where they wanted to snap naturally and viola!!!! I didn't even have to use a knife or a cutting board!!!! I love when there is so little to clean up. Thanks READER! you know who you are!!!

So people, keep the suggestions coming, i am learning something new everyday!!!

Maple Glazed Salmon
from cooking light magazine

  • 2  teaspoons  paprika
  • 1  teaspoon  chili powder ( I used Chipotle )
  • 1/2  teaspoon  ground cumin
  • 1/2  teaspoon  brown sugar
  • 1  teaspoon  sea or kosher salt
  • 4  (6-ounce) salmon fillets
  • Cooking spray
  • 1  teaspoon  maple syrup

Pre-heat the oven to 350.
Combine first 5 ingredients. Sprinkle fish with salt; rub with paprika mixture. Place fish on  a greased pan and put it in the oven for 10 minutes. With a pastry brush  lightly coat the fish with the maple syrup and put it back in the oven  for another 12 minutes. Fish is done when it flakes easily with a fork.

Please do try and let me know how you enjoy it. Happy EATING!!!

Tuesday, September 1, 2009

Simple Asparagus: Heather-Style

Whats the point of a blog if you aren't going to post regularly? Believe me I KNOW! When I find a blog that I enjoy, I often times get very irate if the blogger does not post regularly, and then I completely lose interest.

In my last post, I had said that I would try to be better about becoming more regular, and I want to dearly apologize as I did not keep up with my end of the bargain. That being said, there are no excuses except that August was a very busy month. From this day forward, I will try to update atleast once a week or my reader's can kick my butt! :)

I have been eating a TON of asparagus lately... the summer has been chugging along with a lot of fresh greens and veggies in my kitchen. Asparagus however, is a recent addiction of mine. I discovered it!!! I asked my bestie- Heather, if she knew anything about this veggie before I decided to try it. What do you know? Its her FAVORITE!!! She told me how to cook it, and I make it a at least twice a week the same way she has told me , and its like MAGIC. Delicious & soft and a perfect  healthy accompaniment for any meal!

Simple Asparagus- Heather Style
1 bunch of asparagus
olive oil, salt & pepper to taste.

Cut off all the white ends off each stem. Blanch in hot water for 3-4 minutes. Transfer to a baking dish. Mix in oil, salt & pepper. Bake in oven for 8 minutes at 350. Serve... so soft it just melts :)

Wednesday, August 5, 2009

Healthy Chicken Taco Night!!!


Dear Readers: I am sorry if my posts don't come as often as I cook. I mean to, I really do, from the bottom of my heart.  My life has been a little crazy right now, and my attention has been elsewhere. I promise that once everything is on track I will be updating more frequently, so don't forget about me in the meantime :)

 Alright.. TACOS TACOS TACOS!!! it is the perfect light summertime dinner. Isnt it? I know that all of you out there don't like staying in the kitchen too long when it is absolutely blazing in there. My kitchen gets ZERO ventilation, so my summer dishes are literally made with my sweat (ew, not on the food, just on my face!). Due to this, I tend to get lazy during these months. My solution? Taco's and salads (next post will be about a salad probably). I try a lot of variety in my cooking, but mexican tops the list of summer time favorite dinner meals. This was so simple, that I shocked myself. If you don't feel like staying in a hot kitchen and slaving away, try these taco's. I bet you already have all the ingredients in your kitchen.

I made my "kick ass salsa" from my previous post: Resh's Kick-Ass Salsa.
Then I made the chicken as follows:

Chicken for Taco's
1 lb chicken breast
1 teaspoon ground cumin 
1 tablespoon lime juice (fresh is best)
1/2 teaspoon chilli powder
salt & pepper to taste

Marinate chicken in all above spices for atleast half an hour. Broil for 5-7 mins on each side. Shred.

OR

Boil chicken breasts for 15 minutes. Remove from pot, and shred with fork. Add all spices and mix well.

Extra veggies I used: fresh Spinach & steamed Corn 

Mix all veggies, salsa and chicken & stuff in store-bought taco shells ( I used whole foods organic brand).
ENJOY!!!!!

Monday, July 27, 2009

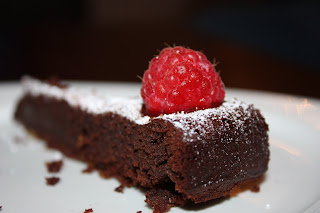
Flourless Chocolate Birthday Cake

                 Birthday's are my favorite event of the year!!! Especially when it is my hubby's birthday. It makes me all warm and fuzzy inside. Also, I love feeding him. Making a special birthday cake that is just for him, fills me with joy. I am so corny right? Well, I can't help it. This is who I am, a corny baker, who loves to bake for her family. Speaking of which, this is where I got the idea for this recipe. My husband has a wonderful Aunt whose food is to DIE FOR! She passed over this recipe for Bete Noire, and I "reshi-fied" the cake with whatever ingredients I had handy. Ok!!! now less talking, more gawking at the delicious cake.  Review the recipe, drool over the pictuers and decide to make this for your chocolate desert wish. Decadent. Rich. Smooooottthhh...... and oh so fabulous!!!

P.S: Ganache goes beautifully with this cake, but I chose confectionar's sugar and Raspberries instead to decroate. Berry Nice!!!!


Flourless Chocolate Cake
adapted from: A Mingling of Tastes
2/3 cup sugar
2 tblsp. cocao powder
¼ tsp. salt
1 stick butter
8 oz. good quality bittersweet chocolate, chopped
1 oz. dark chocolate, chopped
4 eggs
2 tsp. vanilla extract
1 tsp orange peel
1/2 cup ground pistachio's ( I made mine by putting shelled ones in the food processor)

Garnish:
Confectionars Sugar
Raspberries


Preheat oven to 350 degrees. Line the base of a 9-inch springform pan with parchment paper, cut to fit the pan. Butter the parchment and the sides of the pan.

Coat the top of the parchment paper with butter, and add the ground pistachio's to make a small layer of nuts. Combine the sugar, orange peel, cocoa and salt in a large bowl. Whisk the eggs with the vanilla and add to the bowl. Stir to combine. In medium saucepan, melt the butter over low heat. Add the chocolate and whisk constantly until completely melted. Remove from heat. Add the chocolate to the sugar-egg mixture and whisk until completely combined. Batter should be thick and fairly smooth. Pour into prepared pan and bake for 40-45 minutes or until a toothpick inserted in the center comes out clean. The cake will be firm and pulling away from the sides of the pan. Cool completely in pan. Garnish with Sugar and surround with raspberries.

Thursday, July 16, 2009

Grill Me Baby! Sharon's Chicken and My Salsa

Tell me, what are beautiful summer days like? For me, its the perfect temperature, there is a slight breeze, the food is scrumptious and the company is great!!! We visited our friends over the July 4th weekend. to enjoy a swim, conversation and relaxation. There is nothing better than sitting by the pool eating some salsa and enjoying your delicious meal. I believe that particular Sunday to be especially wonderful because my friend Sharon sizzled the yummy chicken and veggies over the grill. I couldn't stop eating. You know you are eating some goooooooood stuff when people start coming up to you and say "wow that smells delicious!" Of course, I had to have the recipe!


I couldn't just eat and not tell others how to make this. I need to tell you all about this simple recipe... but before I do so, I want to add that I made some kick-ass salsa and it was the perfect compliment to her mouth-watering chicken. This recipe is so simple that I am almost ashamed to tell you: but I will, because I am all about easy cookin'.

Basic Salsa
1 Onion
1 Tomato
1/2 bunch of cilantro
One fresh lime
Salt to taste
Chop everything up. Dice it nice and tiny. Mix in the fresh lime and add salt. Blend well and eat with chips. Oh and you can add jalapeno for some extra pep!!!


Savory Chicken & Vegetable BBQ
So now that you guys have a fabulously easy recipe for a summer appetizer, I am going to pass you over to Sharon. She is a wonderful writer & a podiatrist. Sharon blogs about many things such as, movies, restaurant reviews and podiatry (though more recently the food she cooks!) She calls this Savory Chicken and Vegetable BBQ. Though for me, its going to be the best damm grilled chicken I have ever had. Truly. No biases.
Her other blogs include:

One gorgeous photo of her chicken... make it for your next BBQ and don't forget to tell me about it!!!! Oh, and how did you all celebrate your 4th of July, did you have a beautiful summer day like I did? ;)


Friday, July 3, 2009

Red, White and Blueberry-Cherry Crumble Bars


What is your favorite thing about Summer? What Resh loves most about summer are the fruits. Wow! As soon as summer rolls around, the super market gets packed with all different varieties of delicious colorful fruits. Sometimes, I don't know which fruits to put in my basket and which to ignore. Kiwi's, pineapples, oranges (a billion different types of oranges), blueberries, raspberries, strawberries, peaches, apricots, plums.. and on and on and on. So I grabbed some blueberries (packed with anti-oxidants by the way) and some cherries. I had decided that I will use the blueberries for my morning yogurt shakes and the cherries to snack on in between lunch and dinner (instead of the chocolates, because I could gobble those up in a day hehe). Anyway, yogurt shakes and plain cherries weren't cutting the mustard for my enormous sweet tooth. I need something crumbly, moist and and gooey. These were gooooeeeeeeeeeeeeeeey and I LOVE GOOEY!! I think these could be made with any type of berriers you have lying around. Just mix and match!!!!

Red is for the Cherry, Blue is for the berry , and white is for the dough- even though there is nothing sweeter than Freedom, these sure do come close.

Blueberry-Cherry Crumble Bars
adapted from Smitten Kitchen

Yield: I cut these into 36 smallish rectangles

1 cup white sugar
1 teaspoon baking powder
3 cups all-purpose flour
1 cup cold butter (2 sticks or 8 ounces)
1 egg
1/4 teaspoon salt
Zest and juice of one lemon
4 cups fresh berries (2 cups blueberries/2cups cherries, pitted, chopped)
1/2 cup white sugar
4 teaspoons cornstarch

Preheat the oven to 375 degrees F (190 degrees C). Grease a 9×13 inch pan.
In a medium bowl, stir together 1 cup sugar, 3 cups flour, and baking powder. Mix in salt and lemon zest. Use a fork or pastry cutter to blend in the butter and egg.(TIP: fork doesn't work as well, pastry cutter is best, but I didn't do either- I used my hands to mix in the dough & butter together so that it got crumbly) Dough will be crumbly. Pat half of dough into the prepared pan. In another bowl, stir together the sugar, cornstarch and lemon juice. Gently mix in the blueberries & cherries. Sprinkle the blueberry-cherry mixture evenly over the crust. Crumble remaining dough over the berry layer. Bake in preheated oven for 45 minutes, or until top is slightly brown. (This took an extra 10 to 15 minutes in my oven.) Cool completely before cutting into squares.

Monday, June 29, 2009

My Imperfect Chapati's

 
    They are supposed to be soft, round and delicious to eat with any type of curry or daal. However, mine did not come out soft or round (but they were delicious!). I gave myself an A for effort after I finished making them even though they do not meet the normal chapati standards.  You all know that I do not like to stay in the kitchen too long. I like recipes that are easy, quick and nutritious and these seemed to fit the bill. Chapati's usually don't take my mother too long. So, I always thought that when the time comes it will be just as easy for me. Nope. Sure, I have made them before. I can count on one hand the number of times I have tried to make them. Maybe that is why I haven't perfected them yet? hmm.. practice makes perfect I guess.
    
   For those that are not aware of this wonderful accompaniment and substutituon for rice in Indian cooking; its a flat pancake-like bread cooked on a griddle or otherwise also commonly known as Roti. I make mine with whole wheat, for obvious health reasons. 
     
      So getting back to how imperfect they turned out. I fed these to my hubby this week along with some yellow daal (varan,the recipe is on here in one of the previous posts) and I knew they had come out a little hard, but he did not complain. He even took them to lunch the next day, so I had no reason to mention that they had not turned out has expected. However, this weekend when we went up to my mother's, my sister -in- law created the most wonderful chapati's that beat mine to the dust! He could not stop raving about how supple, soft and wonderful her's were. I did not fret- I took them as a challenge. This blog is a post to show that not all things I cook come out right, you cannot see them in the pictures- but they weren't that great. I will be making these again with some tips that my momn gave me, so that I too can create the most delicious chapati's in the world. So finally my husband can say "Resh, these are bangin." But they photograph so well don't they?


My mistakes:
  1. I left them on too long on each side of the pan (abut 3-4 minutes each) when 30 seconds on each side will do
  2. I had it on high flame instead of medium
  3. I pressed down on them as they were cooking instead of leaving them alone.
AVOID the above- follow the steps as is, and I guarantee that they will come out absolutely perfect!!!


1 cup whole wheat flour
2 tablespoons olive oil
3/4 cup room temperature water or as needed 


In a large bowl, add the whole wheat flour. Add water to the dough, and keep kneading it. Add some more water till the dough reaches al elastic consistency but is not sticky. Add the olive oil and knead till well combined. The oil will help with the sticky factor as well.  Knead the dough on a lightly floured surface until it is smooth. Divide into 10 parts, or less if you want bigger breads. Roll each piece into a ball. Let rest for a few minutes.
Heat a skillet over medium heat until hot, and grease lightly. On a lightly floured surface, use a floured rolling pin to roll out the balls of dough until very thin like a tortilla. When the pan starts smoking, put a chapati on it. Cook until the underside has brown spots, about 30 seconds, then flip and cook on the other side. Continue with remaining dough.

Tuesday, June 23, 2009

Stuffed Round Zucchini

 
              I am happy today!! I am happy because when I first saw round zucchini's in an Israeli cookbook, I didn't think that I would end up finding them locally a month later. Who doesn't love farmer's markets??? And this may shock some of you that already know about these wonders of nature, but to me I didn't even know they existed until a few months ago.   This is my perfect vegetable! I love to stuff and I adore squash. "WHERE CAN I FIND THIS?" was my mantra for about four weeks.  I knew that the only place I would probably run across them was in a farmers market. That is exactly what happened, but it happened unexpectedly when I was out with my cousin in Union Square. It's my favorite farmers market  Though on the bit expensive side, there is nothing they don't have. What shows up in my vision? Yup you guessed right, a round zucchini's, it was like a gift sent from the heavens. I think I even heard a few angels sing as I actually zoomed in to grab a few. To top it off, they were grown in South Jersey, so I knew that iwas supporting my Jersey farmers too. Victory!! I packed three. One for me, one for the hubby, and one for lunch the next day. 
Round zucchini's are no different than the regular long ones, they are just cuter and easier to stuff. There are many variations to this, but I chose ground chicken. I had it stocked, and I always improvise with whatever is in the kitchen.
So here goes:

Round Zucchini
4 Round Zucchini
1/2 lb of ground chicken
1 small onion, diced
2 cloves of garlic, pressed
1 teaspoon herbs de provonce
1/2 cup veggies (I used spinach and mushrooms)
Olive Oil
Salt & Pepper to taste
Preheat the oven to 375°. Cut a thin slice off the tops of the round zucchini and discard them. Using a small spoon, scrape out the flesh, leaving a 1/4-inch-thick wall. Coarsely chop the flesh and squeeze dry.
Heat 1 tablespoon of the olive oil in a large skillet. Add the diced zucchini and veggies season with salt and pepper and cook over moderately high heat, stirring, until barely tender, about 3 minutes. Transfer to a bowl.
Heat 1 tablespoon of the olive oil in the skillet. Add the onion, garlic, herbs de provonce and scraped out zucchini flesh and cook over high heat, stirring occasionally, until tender, about 4 minutes..Stir in the chicken season with salt and pepper. Cook till all the water/fat has evaporated and its relatively dry (the chicken should be cooked by this point)
Season the zucchini cups with salt and pepper and brush the outside with olive oil. .Mound the stuffing in the cups. Set the zucchini on a baking sheet and bake for about 40 minutes, or until tender and heated through. Serve hot or at room temperature.

Wednesday, June 17, 2009

One Lovely Blog Award and Iced-Tea to sweeten the deal..

Yay!!! Someone thinks my blog is lovely and has bestowed upon me my very first blog award! Thank you so much Muneeba from An Edible Symphony. An amazing blog filled with yummy dishes that I have cooked in my own kitchen!!! I cannot thank her enough as I am giddy with excitement and now I can show off my new award. Yippe!!!

Ok down to business...The rules of this award is that I pass it on to ten blogs which I have recently discovered. Then, those recipients are supposed to do the same.

The following blogs have tickled my fancy and are truly unique. I love 'em all, and I hope you feel the same way. To kick off the summer, I made some sun-brewed iced tea. Make some now!!(recipe below); then enjoy a cool glass of iced-tea and surf through all the yummy blogs that I am passing this award to.
So here goes:


Sun-Brewed Iced Tea: I made this because we love drinks in our home. Juices, Iced Tea, Lemonade etc. Times are tough, and I can't keep running to the store all the time. So, I decided to make my own iced-tea. This way I get to control the amount of sugar my family is drinking and that I always have an unlimited supply. There are a billion variations, i.e: add lemons,or mint, or peaches. Just try it your way, with this basic recipe.
Very simply, fill up a glass container with water, add sugar. Stir. Use your judgment on the tea bags, you don't want your iced tea to be too strong (unless you like it that way). I put about 8 Lipton tea bags, covered it with saran wrap and let it out in the sun for 3 hours. Discard tea bags, and put the tea in the fridge till cold. DRINK UP and enjoy the summer!!!!


Friday, June 5, 2009

ShakShuka: With Love, From Tel-Aviv


Its been ages hasn't it? Yes it has. I haven't written anything in a month! That was not my intention, I had planned on putting up bits and pieces of my vacation on the blog, to showcase different foods that I have tasted from Israel and Holland alike. That opportunity never came. This was a very busy vacation, but one that was filled with the most amazing food. From a Lafa (flat pita with Lebane cheese) to Gevulde Koeken (holland cookies filled with almond paste).


     In Israel, we delighted in refreshingly fresh salads, hummus, burgers (yes! the best burgers EVER) and Limonida's (lemonade with giant mint leaves). Even though I felt bad about leaving such wonderful dishes behind in Israel, Holland also had some fantastic foods to offer our tastebuds. For starters, there is nothing like their French Fries with Hollandaise sauce..or mayo. Every biscotti made my daily coffee ever so better. I had to buy some cookies and bring them back! Amsterdam spoiled us to no end. I desire their pancakes on a daily basis now.  I even ook the hubby to the supermarket in Amsterdam. Yes, that is how obssessed I am with supermarkets. I picked up about 3 different types of cookies to drink with my tea. The best one of the lot was Gevulde Koeke. So.Damm.Good.


I will be attemtping to make some of these tasty dishes in my own kitchen. Let's see how successful I am?

As far as this Shakshuka is concerned, my Father-In-Law makes the most amazing shakshuka in the world! This one is straight from his kitchen, made with his own two hands. I cannot tell you how easy it is to make this, and I will share some of his secrets so that you too can enjoy this yummy breakfast, lunch or dinner with very minimal effort.
Bon Appetit.
Shakshuka (Israeli Egg Dish, mainly for breakfast)
4 Eggs
1 red or green pepper, cored and diced
1 small onion, diced small
2 garlic cloves, pressed
2 plum tomatoes, diced
1/2 cup tomato sauce
1 medium jalapeno, thin round slices
1 teaspoon tabasco sauce
1 teaspoon cumin
1/2 teaspoon paprika
salt & pepper to taste
olive oil

Break open the eggs in a small bowl and set them aside.  In a saucepan, heat the olive oil. Add onions and garlic. Keep mixing till the onions   become translucent. Add the tomatoes and jalapeno's. Cover and let cook till the tomatoes become mushy and you start to see a sauce like consistency. At this point, add the tomato sauce and the rest of the spices. Mix, cover and cook for 5 minutes. When the sauce is blended well, add the open eggs slowly over the pan. Do not touch the eggs. The eggs should coat the top of the sauce completely. Cover and cook for another 7 mintues, till your desired doneness. Serve with pita or bread.

Posted by Picasa

Wednesday, April 29, 2009

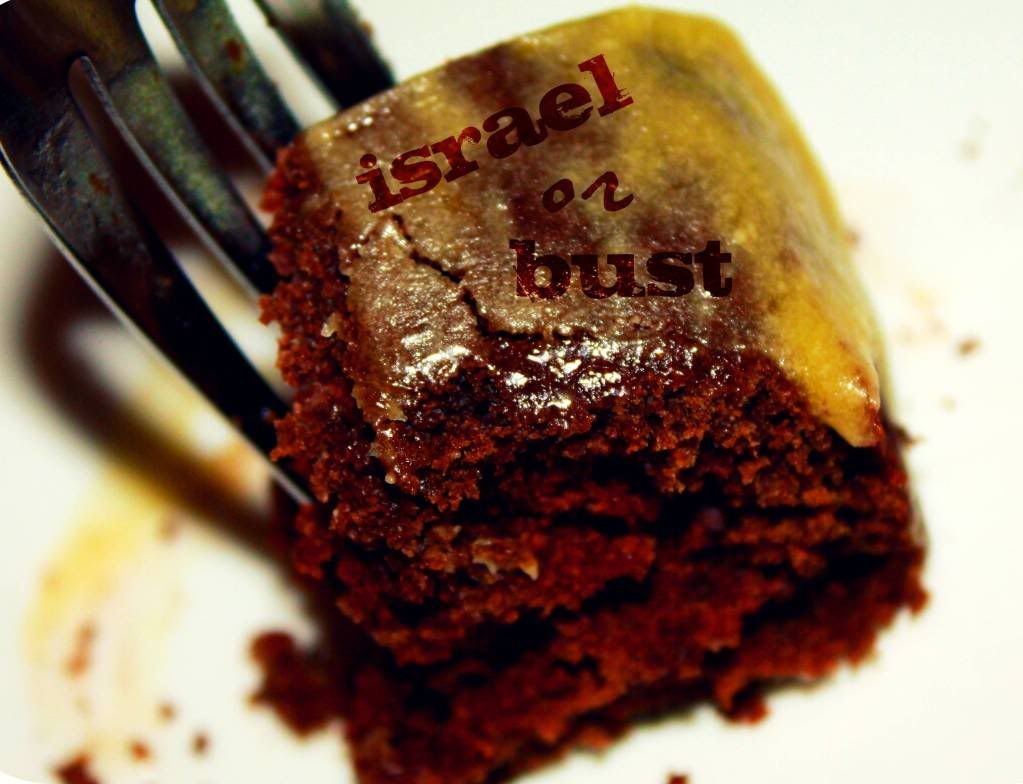
Chocolate Cake & Mango Ganache


Yup! We are going to Israel this summer for vacation. I cannot contain my excitement!  I am leaving this Friday, and wont return for 2 weeks. Therefore, I want to leave all my readers with a dangerously addictive mix-in-pan-eggless-chocolate-cake. All my desserts have some basic chocolate flavor to it recently, and that is because chocolate has been on mind- A LOT! Hopefully getting a change of scenery, will help inspire some  new dishes. I have a feeling I may also post from Israel as I am taking my laptop with me.

Most of what I bake on my blog is from JoyofBaking.com A FABULOUS baking website and just my style.


A story about the Mango Ganache: It was supposed to be Mango frosting but it turned into ganache. I never made frosting before because I don't like decorating cakes or desserts much. I find it time consuming, but you may have guessed that by now because most of my recipes are super simple. Anyway, I had a mango staring at me in the fridge, calling out my name! Ok, so when I somehow ruined tried the recipe, I had no idea at what point frosting becomes frosting.  Anyway, I completely freaked out  that even after adding so much sugar, the consistency would not harden. It was making me sick. I couldn't go on any further,  so I left the soft consistency and managed to chill it in fridge long enough for it to become a mangoish glaze over the chocolate cake.

SO, I guess I will see you all on the other side of this break?
In the meantime, I hope I have convinced you to make this cake, and EAT IT!

Chocolate Cake
Adapted from Joyofbaking.com

1 1/2 cups  all purpose flour
1 cup  granulated white sugar
1/4 cup unsweetened cocoa powder (not Dutch-processed), sifted
1 teaspoon baking powder
1 teaspoon baking soda
1/4 teaspoon salt
1/3 cup unsalted butter, melted
1 cup warm water
1 tablespoon lemon juice (or vinegar)
1 teaspoon pure vanilla extract

Preheat the oven to 350 degrees F  and place rack in center of oven. In an ungreased 8 inch square cake pan, stir together the flour, sugar, sifted cocoa powder, baking powder, baking soda, and salt. Add the melted butter, water, lemon juice, and vanilla extract. With a fork, mix all the ingredients together until well blended. Bake in preheated oven for about 35 minutes, or until the cake springs back when lightly pressed and a toothpick inserted in the center of the cake comes out clean. Remove from oven and place on a wire rack to cool.


Mango Frosting Ganache


1/2 cup butter, softened
1/2 cup mango puree(blend mango chunks in blender with sugar)
Zest and juice of 1 lime
  
4-5 cups of powdered sugar (i ended up using 6 cups & stopped)
In a mixing bowl, cream butter until light and fluffy. Add mango puree, zest and juice. Mix well. Add powdered sugar, 1 cup at a time, until desired spreading consistency is reached. My consistency never reached a peak. After a while, adding more powdered sugar just made it too sweet. I didn't want my chocolate cake to be overpowered by a "too-sugary" frosting/ganache. I also chilled it for about 1 hr, before applying on cake.  This particular recipe created a whole lot of ganache, I think one can easily half the quantity for a regular cake.

ice.eat.enjoy!

Saturday, April 25, 2009

Stuffed Peppers

Today's Note: Blogger has been getting on my last nerves!. My comments button is very moody and sometimes doesn't show itself on certain posts. How RUDE! I have tried everything under the sun, and sometimes the box just ain't there. So, sorry readers that want to but can't comment on some posts. Till I get this fixed, you can always email me at, Resh.Mah@gmail.com thanks :)

So, back to the recipe at hand:
I am sure that there are many different types of dishes that you personally have not yet tried. I €don't mean that you haven't tried them yet because you haven't visited the country. It could be a dish at a Chinese restaurant that you never ever order, but wonder what it would taste like? That's how I felt with Stuffed Peppers.

Actually, the first time I saw it being cooked, I drooled just watching them simmer. Israel introduced me to this easy-to-stuff quick meal that was mouth watering from start to finish. My husband's grandfather insisted that we eat proper dinner every night when we visited, and we started with Stuffed Peppers. It took me a while after eating this dish for the first time to make it again in my home. I tried to find an Israeli version of this, but was unsuccessful. After a few trials & errors this recipe has perfected itself. Its hearty and I have learned to add a variety of veggies to it so that the taste doesn't bore us. I am going to try making this with couscous and fresh veggies for all my vegetarian friends, so look out for that.
I know that there are many variations to this dish, any ideas would be welcome :)
Enjoy. Perfect for a Monday night meal.


Stuffed Peppers
2 medium green peppers
1/2 lb of ground beef or chicken
1/2 cup cooked white rice
2 cloves crushed garlic
1/2 cup chopped veggies (mushrooms, carrots, squash)
1 tspn italian seasonings
1 medium chopped onion
2 tblspn Worcestershire sauce
1 cup tomato sauce
Salt & Pepper to taste

Equipment:
Steamer

Remove and discard the tops, seeds, and membranes of the bell peppers. Steam the bell peppers till slightly mushy ( about 10 mins ) and place in a baking dish. In a medium sauce pan, heat up a tablespoon of vegetable oil and sautee garlic and onions together till the onions are soft and translucent. Add the veggies and spices and sautee the vegetables till the mushrooms give off some liquid. To this, add the ground meat along with salt & pepper. Mix all and brown the meat for about 10 minutes. Add tomato sauce and let the mixture come to a slow boil. Remove from heat, mix in rice and add the worcestershire sauce. Blend well and stuff into each pepper. If desired, top with cheese and bake 10 minutes on 350, otherwise dive in!


Tuesday, April 21, 2009

Green Chicken Pulao


My mother never has to look at recipes to know just how to optimize on a single marinade and incorporate it into several different varieties. Green chicken pulao (rice) is just that perfect example. As she made this, I noted it all down. I love her little lessons. She goes real fast!! I had to be quick enough to ask her questions at the right time and make remarks as necessary. This dish is fairly easy if you have that stuff lying around. I tend to make the green masala and freeze it (another good idea from my mother). This way I always have the masala to make a quick Indian meal.
Green Chicken Pulao
1 lb chicken breasts, cut into pieces
Marinate this chicken in green masala
1 cup yogurt
Rice:
1 cup long grain basmati rice
1 teaspoon whole cloves
3 medium red potatoes, cut in chunks
1 medium diced onion
1/4th tspn turmeric powder
1 tsp coriander powder
1 tspn cumin powder
salt to taste
1 tblspon vegetable oil

Boil potatoes in a large pot till about moderately tender (around 15 mins the fork should easy slide in, but the potatoes should not be too soft). In a mixing bowl, mix together yogurt, chicken &  green masala. Let marinate for 30 mins in the fridge. At the same time, in another pot, add onions and sautee till soft. Add cloves, and the balance of the dry spices (including salt); satuee the onions some more till all the spices blend. Add chicken, mix well alltogether. The yogurt should make a nice creamy blend. No need to add extra water at this point. The chicken should start cooking now. Keep a close eye on the chicken curry, if it tends to dry a bit, then you may add some water. Add rice after 15 mins or so, cover & cook for another 20 mins. The rice should fluff up when cooked and the chicken should be tender. Serve with raw onions marinated in lemon & salt.


Thursday, April 16, 2009

Chocolate Chunky Cookie


Chunky cookies are my absolute favorite. It doesn't matter what kind of cookie it is, as long as it has nuts/raisins/choco chunks/ etc.. I could go on. Any simple basic cookie is transformed with the addition of different chunks. This week's craving was chocolate. So the hunt for a good chocolate cookie began! I wanted to find a basic one that would easily fulfill my craving. Anyone who knows me  also knows that chocolate is my sweet spot. So what better than a chocolate cookie mixed in with a little fruit n' crunch? I found this recipe on joyofbaking.com, and added the cranberry-pecans because that is what I had handy. Try your version and add your own crunch to this chocolatey fruity cookie.

Chocolate Cranberry-Nut Cookie
adapted from joyofbaking.com

1/2 cup unsalted butter, room temperature
1/2 cup light brown sugar
1/4 cup white granulated sugar
1 large egg
1 teaspoon pure vanilla extract
1 cup all purpose flour
1/4 cup cocoa powder
1/2 teaspoon baking powder
1/8 teaspoon salt
1 1/2 cups mix of whatever you desire ( I used cranberry & pecans)
Pre-heat the oven to 350 degrees. Line two baking sheets with parchment paper. In the bowl of your electric mixer (or with a hand mixer), cream the butter and sugars until light and fluffy (2-3 minutes). Add the egg and vanilla extract and beat until incorporated. First sift together the cocoa powder, flour, baking powder, and salt and then add to the butter and egg mixture. Mix just until incorporated.


Fold in the the cranberries and pecans. Using a small ice cream scoop or two spoons, place about 1 1/2 tablespoons of batter on the prepared baking sheet, spacing about 2 inches apart. Bake for approximately 8 minutes or until the the cookies are still soft in the center but are firm around the edges. Remove from oven and let cookies cool on baking sheet for about 5 minutes before removing the cookies to a wire rack to cool completely.
Posted by Picasa